%201.55.34%E2%80%AFp.m..png)
ChatGPT is a very powerful AI tool that is enabling entrepreneurs and professionals to achieve more. Even though the tool has been around for a couple years, many people are still discovering the capabilities and features of the tool as they become more familiar with it. However, great documentation does not currently exist for ChatGPT or any other AI tool due to their fast cycle of updates and myriad of different uses.
While going through the settings, we discovered a potential issue that many people online have also faced: a lack of available information regarding how to link ChatGPT’s builder profile to a website. This blog will explain exactly how to do this to help you avoid common troubles with the process.
What is the builder profile in ChatGPT?
The Builder Profile in ChatGPT is a feature that allows creators to personalize and verify their identity within the platform. By setting up a Builder Profile, you can establish credibility and share your GPT creations with a broader audience. To set up your Builder Profile, navigate to ChatGPT's settings and select "Builder Profile," at https://chatgpt.com/#settings/BuilderProfile and follow the verification steps, which allows you to link to a website domain and various social media profiles.
What are the advantages of linking a website to the builder profile in ChatGPT?
Linking your website to your ChatGPT Builder Profile offers several advantages:
- Ability to publish your own custom GPT: Completing your builder profile allows you to publish your own GPT (Generative Pre-trained Transformer) in ChatGPT, which allows you to share a customized AI model. By publishing your custom GPT, you provide users with a specialized AI model tailored to specific needs, enhancing their interaction experience. This process is designed to be user-friendly, requiring no advanced programming skills.
- Enhanced Credibility: A verified website link demonstrates authenticity, building trust with users.
- Increased Visibility: Direct access to your website can drive more traffic, expanding your audience reach.
- Brand Consistency: Aligning your ChatGPT profile with your established online presence ensures a cohesive brand image.
- Professional Networking: A linked website facilitates connections with other professionals, fostering collaboration opportunities.
By integrating your website, you not only bolster your professional image but also create pathways for user engagement and potential growth.
Can linking a website to the builder profile in ChatGPT count as a backlink for SEO?
Linking your website to your ChatGPT Builder Profile can indeed provide a backlink, which may contribute to your site's SEO. While the direct impact of a single backlink from ChatGPT on your search engine rankings might be limited, it still offers several advantages:
- Increased Visibility: A backlink from ChatGPT can drive traffic to your site, enhancing its visibility.
- Enhanced Credibility: Being associated with a reputable platform like ChatGPT can boost your site's authority.
- SEO Benefits: While one backlink may not significantly impact SEO alone, it contributes to a diverse backlink profile, which is beneficial for search engine algorithms.
Linking your website to your ChatGPT Builder Profile not only enhances your professional credibility, but it also is an easy way to get a backlink to your website and provides users with direct access to your online presence.
However, the process can be challenging due to varying DNS configurations across different hosting providers. This guide will walk you through identifying your website's host, updating DNS settings, and successfully linking your domain to your ChatGPT Builder Profile.
How to link your website to ChatGPT’s Builder Profile
1. Identifying Your Website's Host and Nameservers
Before updating DNS records, determine where your domain is hosted or where its nameservers point:
- Using WHOIS Lookup:
- Visit a WHOIS lookup service (e.g., whois.icann.org).
- Enter your domain name to retrieve information about your registrar and nameservers.
- Checking Domain Registrar:
- Log in to your account with the company where you purchased your domain.
- Navigate to the domain management section to view nameserver details.
2. Accessing DNS Settings
Once you've identified your hosting provider or DNS manager:
- For cPanel Users:
- Log in to your cPanel dashboard.
- Navigate to the "Domains" section and select "Zone Editor" or "DNS Management."
- For Other Hosting Platforms:
- Log in to your hosting account.
- Locate the DNS management area, which might be labeled as "DNS Settings," "Manage DNS," or similar.
3. Adding the TXT Record for Domain Verification
To verify your domain with ChatGPT:
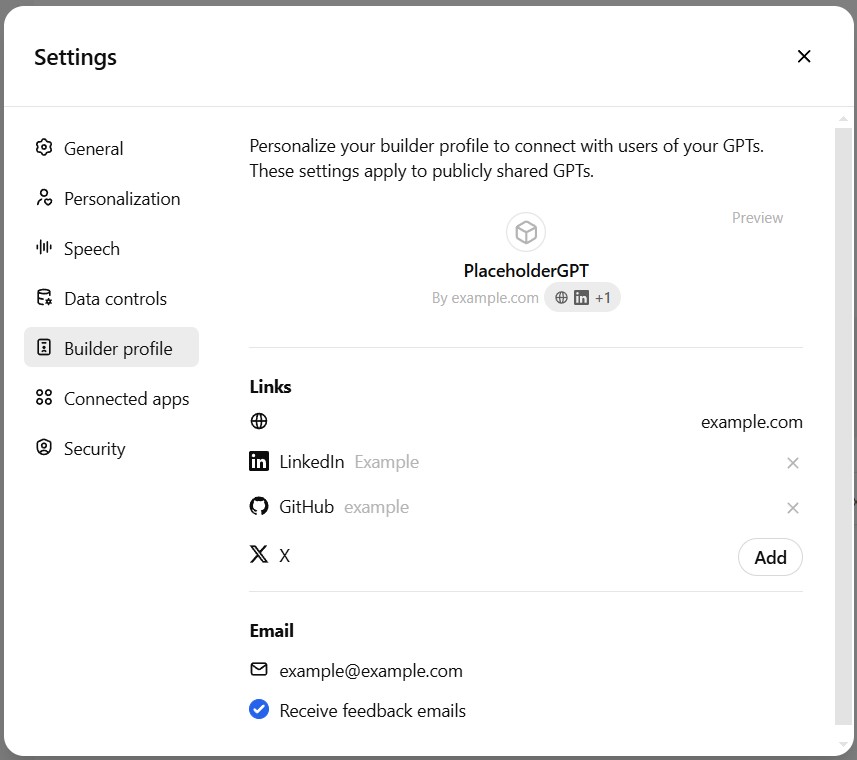
- Initiate Domain Verification in ChatGPT:
- Log in to your ChatGPT account.
- Navigate to "Settings" > "Builder Profile."
- Under the "Website" section, click "Verify new domain."
- Enter your domain name (e.g., example.com) and submit. (Be sure to not include http://, https://, www., or trailing slashes)
- ChatGPT will provide a TXT record value for verification. The code will look something like openai-domain-verification=dv-6gw2qVXlSB57FSGQ9JRkbJuG.
- Add the TXT Record to Your DNS:
- In your DNS management dashboard, select the option to add a new record.
- Choose "TXT" as the record type.
- Host/Name Field:
- Depending on your provider:
- Enter @ to represent the root domain or leave it blank
- If @ or leaving the field blank isn't accepted, enter your domain without http://, https://, www., or trailing slashes (e.g., example.com).
- Depending on your provider:
- Value Field:
- Paste the TXT value provided by ChatGPT.
- TTL (Time to Live):
- Set to the default value or the lowest possible setting to expedite propagation. 14400 is often the default value in this field and 600 is often the lowest value that a host will allow.
- Save the new TXT record.
When completed, the new TXT record in the DNS should look something like this (depending on your host):

4. Completing the Verification Process
- DNS changes can take up to 48 hours to propagate, though they often take effect in seconds.
- After allowing time for propagation, return to the ChatGPT "Builder Profile" settings.
- Click "Check" to verify the domain.
- Upon successful verification, your website will be linked to your ChatGPT Builder Profile.
- That’s it, you are all set.
Many people online have reported having difficulty with the Name/Host field when adding these TXT records, so hopefully this blog will help you to avoid that and get your ChatGPT profile completed. Below are additional troubleshooting tips and our contact information should you require further assistance.
Troubleshooting Tips
- Propagation Delays: If verification fails, ensure sufficient time has passed for DNS propagation.
- Accurate Entry: Double-check that the TXT record's host/name and value fields are correctly entered.
- Support Resources: Consult your hosting provider's support documentation or contact their support team for assistance with DNS modifications.
By following these steps, you can seamlessly link your website to your ChatGPT Builder Profile, enhancing your professional presence and providing users with direct access to your online platform.
Need Additional Help?
Ready to elevate your brand and connect with your ideal audience? Bananas Creative, located in Edmonton, Alberta, specializes in branding, website development, and marketing services tailored to make your business stand out. Contact us today at 780-885-5285 or visit https://www.bananascreative.ca/contact-us to start your journey toward business growth and success.


.jpg)


.jpg)


.jpg)
.jpg)
.jpg)
.jpg)
.jpg)
.jpg)


.jpg)


